Monday, April 30, 2018

Assignment 37 - Silhouettes that tell a Story


How do you know what the story is in this image?  Is it because we know what love "looks" like?  Is it because of the added color?  The added symbols?

Your assignment is to create a silhouette that tells a very simple story.  It could be a story of love, of despair, of anger and hate, of elation, or maybe just plain fun.  You may work with another student in class but your images must be unique. 

Take a look at this link to find ways of capturing that silhouette - or try your own technique.

Due May 2, end of class.

Thursday, April 26, 2018

Assignment 36 - Time for another Capture Challenge!

I'm smiling because Capture Challenges are so much fun!

Choose a partner.  Grab your cameras.  Find the BEST, most INTERESTING captures of the following list of prompts.  Move them all into a folder on your desktop.  Resize them all (instructions on the blog, remember?). RENAME each of them, then share them with me.  Good luck! 

1.  Pure Black + Pure White
2.  The letter "S" found in nature
3.  Stairs that lead to nowhere
4.  A dancer's jump caught in midair
5.  Reflection
6.  A swing
7.  Broken glass, found, not created
8.  Mona Lisa Smile
9.  A Secret
10. Blue eyes shining

Monday, April 16, 2018

Assignment 35 - Catch lights - How to make your portraits spectacular!


Catch light (or catchlight) is a photography term used to describe either the specular (the bright spot of light that appears on shiny objects when illuminated) highlight in a subject’s eye from a light source, or the light source itself.  Below are listed ideas, not hard and fast rules.  They are guidelines you might find helpful.
1. Specularity
By their vary nature, catch lights are specular highlights that will often “blow out,” meaning they will be pure white.  There are many highlight purists who think there should never be any area of a photograph that is overexposed.  Think about your image and in the case of catch lights, experiment with your highlights and their value and density.
2. Shape
Many photographers prefer round catch lights to square or rectangular but that’s not always possible to achieve.  Square and rectangular softboxes exist and often you have to improvise.  The reason is simple - the Sun is round so your light source should more closely mirror what nature has to offer.  You are trying and mimic the most natural lighting – the sun. 
3. Position and Balance
Pay close attention to the position of catch light in the eyes of your subject BEFORE you shoot.  While there is no perfect or “correct” position, there are less flattering ones.  Catch lights are more flattering if they look natural, so try to place them  at 10 o’clock or 2 o’clock.  Is there a wrong catch light position?  Below 9 o’clock or 3 o’clock can be unnatural, so watch your light sources before you make the final lighting decision.
And remember, catch lights need to balance.  If the catch light in the left eye is positioned at 10 o’ clock, be sure to balance that out by placing the catch light in the right eye at 10 o’clock, too.  Subjects appear cross-eyed if the catch lights otherwise.
4. Number of catch lights
Depending on the lighting, It can be distracting to see more than one catch light.  So while it’s often unavoidable to have more than one, it’s not difficult to either add or remove catch lights using Photoshop.  You can decide which catch lights are most flattering and natural looking and remove the rest.
Experimenting with and paying attention to catch lights will make you a more observant photographer.

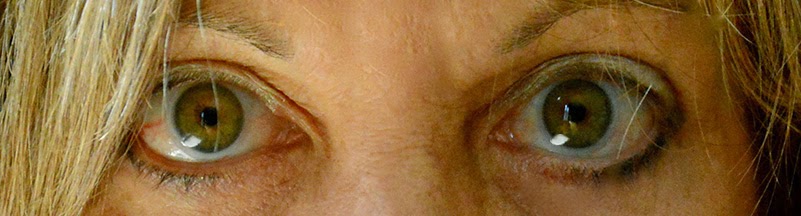
The triangular catch lights here are at 7 o'clock, not ideal but not unnatural-
the light source was bouncing off the floor but only hit the eye to the left.

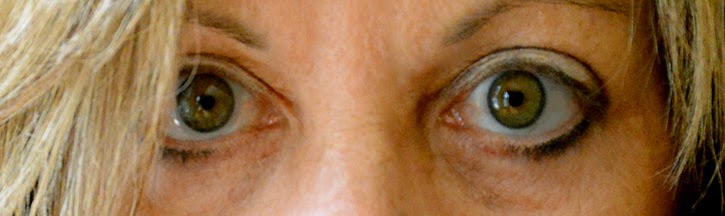
Uneven catch lights.


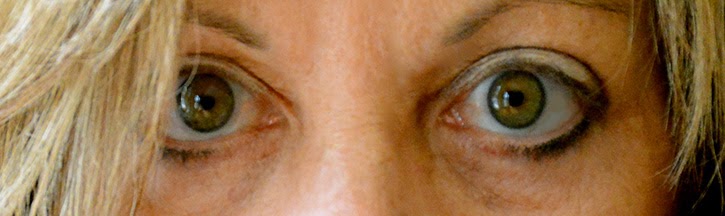
Duplicating the catch lights from the right eye to brighten the left eye.

Due end of class April 18

"I am..." Final Assignment

How do you view yourself here, at Notre Dame High School?  How do others view you?  As families, parents, and prospective students come into the building and see images of you on the wall, how do you want them perceived?

And that's your assignment.

You will be taking on a final assignment that is "real".  You have a client, and that client is Admissions for Notre Dame Belmont.  They have requested we create ten canvases for the hall outside of their office and the entrance to Notre Dame.  Your job is to select from the list below two "I am" themes, create your final concepts to exact specifications, set up your photo shoot using your "professional" knowledge of lighting, location, composition, and Photoshop/Lightroom.

Quite a challenge, and a real-world assignment.  Your final images have the opportunity to be selected to hang in the front hall for all to see, as a canvas.

Timing:  

Select from the list and final approval of two themes - April 20

Give the dates, locations, and concepts of the sessions to Mrs. Kuntz - April 27

Complete photo shoots - May 9

Final production of images - May 19

"I am" List - 2018

I am an athlete
I am a scholar
I am a writer
I am an artist
I am a leader
I am a dancer
I am a musician
I am an ambassador
I am a scientist
I am a volunteer
I am a friend
I am inspired
I am empowered
I am prepared
I am ready for the world
I am spirited
I am enlightened
I am a teacher
I am an alum
I am a mentor


Tuesday, April 10, 2018

Wednesday, March 21, 2018

Assignment 33 - A Triptych that Tells a Story


What is this?

What is the story of this triptych?


A triptych is three of something - usually "like" things put together that tell a story.  Your assignment is to make a photographic story with three images only.  Think of what your concept is first, what are you going to try to say with visuals only?  You might think of an actual story you know and try to recreate it in three frames:  What would Little Red Riding Hood look like in three frames?  The Three Little Pigs?

1.  On your blog, post your story concept in approximately one paragraph.  
2.  Shoot as many images as you think you need, then pare down to three you will use.
3.  If it helps, write the story line under each of your images for clarity.
4.  Use Photoshop, Lightroom, whatever you need.
5.  Shoot in manual and post the technical information for each image.


Due date:  March 28

Wednesday, March 14, 2018

Assignment 32 - Text and the Self Portrait


Self portraits are the norm these days – as a matter of fact, I’m guessing you’ve already taken at least one “selfie” today already.  Now let’s see what you can do by adding in those oh-so-important things like composition, lighting, color, depth of field.  Your assignment: using your self timer and a tripod or other stable surface, capture an image of yourself.  Edit in Lightroom.  Be clear about your composition – you will need to consider space for adding text that conveys something about yourself.  This time I'd like the text to be created in Adobe Illustrator using the Type on a Path tool.  Instructions to be show in class...

Critique: Write 5 sentences about your final piece and its meaning.
.

Due Date:  March 16/19

Thursday, March 8, 2018

Assignment 31 - More MAD Photography!


Time to play again.  Choose one tutorial from the MAD link above and create a final image to post. Post the before and after if there is one and below the image write an explanation of what you did, what the outcome was (expected? unexpected?) and what advice you have for how the tutorial could be used.

Due March 12/13 - end of class.

Monday, February 26, 2018

Assignment 30 - Through the lens in an entirely new way…


David Hockney - a new perspective on seeing

You use your camera as your eye, documenting what you see in your mind.  Now I want you to use your camera to gain another perspective on your images.  Artist David Hockney is a painter and therefore may think of his camera as an extension of his brush.  Rather than just "point and shoot", Mr. Hockney focuses his lens and vision on his imagery as if it were a canvas he is painting in sections.

Your assignment:
1.  Research who David Hockney is.
2.  Tell me something about him as both a painter and a photographer in a posted paragraph or two.
3.  Compose a photograph you will shoot using the same technique.  Use today and the next class to experiment with your camera and the assignment by shooting objects, scenes, and perhaps each other.
4.  Create your final piece on an art board in Photoshop, using the images you have taken.  You will be resizing all your images so use this technique posted on this blog to make that happen.  Do NOT crop your images but use in their entirety.

Due date:  Monday + Tuesday,  March 5 - 6

Thursday, February 15, 2018

Assignment 29 - On Your Own

You've probably been waiting a long time to do "what I want tot do, not what you tell me to" so this assignment is just that - you, on your own.

What photographic technique, image, concept have you always wanted to try but just didn't have the time or didn't know how?

Now you do.

Research ideas you're interested in trying.  Post your proposal on your blog by the end of class today(2/15-16/18), and plan how you will carry out your final work.  The completed project must be done and on your blog not later than Monday, February 26.  

Some thoughts:  
1.  Have a backup plan - weather, light, use of the studio may not always be what you had in mind - Mother Nature is a tricky woman...
2.  Do not procrastinate and then, down to the wire, have to change your plan.  Once you commit, you will be held to what you propose.
3.  Be daring.  Take a risk.  It's much more interesting to make the attempt and learn from what you're doing than to be safe.  Safe is way overrated sometimes...

Final image due end of class 2/26.


Friday, February 9, 2018

Assignment 28: What is a "Walkabout", and what would it look like?

A Photographic Walkabout is to free your mind from itself, to appreciate the world around you, to see through your lens what you might have been missing or maybe see 
for the first time.


You will be using this class to go on a Photographic Walkabout with your partner.  
Decide what direction you want to go then begin capturing.  Stay together, no matter what.  After a minimum of 30 minutes, come back to the class, upload your images, 
and select, between the two of you, those you think are the 
most creative from the same location. 
You may use Lightroom or Photoshop to enhance.

As you head out, imagine the elements around you from their perspective.  Your surroundings look much different from waist high, the ground up, something other than eye level, and you may be missing some incredible photographic opportunities if you spend the majority of your time looking at your subjects from eye-level.  
Change your perspective – what’s in front of you?  Behind you?  Beside you?

In addition, I want you to try this fun technique called "Zoom Burst".  You can find the "how to" at this link:


Image by Stuart Richards

http://www.photographymad.com/pages/view/how-to-take-stunning-zoom-burst-photos

Due:  End of class, Monday, February 13


Monday, February 5, 2018

Assignment 27 - Water + Faucets + Reflections = Beautiful


Who would ever think of faucets as not only necessary but beautiful?  You see and touch them every day, when you get up in the morning, when you do the dishes, water the plants, fill the dog bowl...yet how often do you really look at this fixture?

Your assignment is to photograph, creatively, two different faucets - one at school and one at home.  Think of the lighting and composition, is the water running or not, are you using the reflection in the faucet, abstraction?  All of this should be top of mind as you capture your images.

Post both completed and creative images on your blog.  Title the images.

Due:  February 8th, end of class.

Thursday, February 1, 2018

Assignment 26 - The Power of Abstraction to Express Emotion

Working in pairs, select an emotion.  Your assignment is to create one outstanding image that expresses that emotion.  Try to think abstractly - think about color, forms and shapes, the power of elements and principles.

Emotions are complex, yet we all know them when we see them - love, anger, despair, confusion...how can you show those without the typical cliche images of lovers holding hands, tears being wiped away, the usual imagery we all see on Hallmark cards?

Here is the list:

Love
Anger
Despair
Confusion
Tension
Frustration
Joy
Pity
Shame
Envy
Surprise
Disgust
Patience
Pride

Create the image and alter as you wish.  Using Photoshop, each of you add the word you've been given in a way that exemplifies that emotion in the final image.  Post on both of your blogs.

Due date:  February 6, end of class

Friday, January 26, 2018

Assignment 25 - Now I see you, now I don't…self portrait without you.


The ultimate selfie might actually be one without you even there…just a pair of shoes or some other prop that represents you.  Your assignment:  using manual settings and the sun, photograph yourself with one prop you think illustrates who you are.  You will be using Photoshop to create the final image…

Be creative with the prop.

Morning or late afternoon is the best time to shoot.

Due date:  January 30, end of class

Wednesday, January 24, 2018

Assignment 24 - TED Talk: How Photography Connects Us

TED TALK

In class today I’d like you to think about photography on a different level.  Rather than simply shooting what you see around you, click on the TED Talk link and listen to David Griffen, photo director for National Geographic.  On your blog create a post that summarizes, critiques, and evaluates the video you’ve just watched.  Minimum of three intelligent paragraphs, please.

Due end of class today.