Friday, August 14, 2015

The Digital Sketchbook Project!


The Sketchbook

I have been keeping a sketchbook as part of my studio, art process, and all around capturing tool for as long as I can remember.  When I don’t have my sketchbook, I use a napkin, a receipt, a ticket stub...whatever is available to remember my thoughts, sketches, ideas I have in the middle of whatever I am doing.  I often have several at one time and go back to older ones to see where I’ve been and where I need or want to go.  Your digital sketchbook will allow several things to happen:  it creates a safe place in which to create, you will be able to watch your own creative process develop - ideas that work well along with those that could use more, and most importantly I will be able to watch you problem-solve.  You have a list of prompts to work with and "capture" - think of this as a record of REGULAR creative thinking outside the classroom. Sketchbook work is due every OTHER week, uploaded to your blog by the end of day Sundays.  Lightroom and Photoshop may be used and manipulation is encouraged!Sketchbook Assignments:

  •  The list of prompts is posted, lower right.  They are to be done in order.  Due dates are also posted.
  •  Label your photograph with the prompt and your name.
  •  Subject matter is your choice based on each assignment.
  •  Sketchbook work is to be done outside of class.

Sketchbook 1 is due August 30

Thursday, August 13, 2015

Assignment #1: Photography as Art vs. Photography as Snap Shot: What makes a photograph art or not art?


I like to take photographs...lots of photographs.  I look around and watch everyone using their cell phones, digital cameras, "old fashioned" film cameras and I have to wonder - what makes an "art" photograph different than a snap shot?

Now you have a chance to think about this and visually show your opinion.  Be prepared to explain your choices.

The Assignment:  Bring in two images - one you believe to be "art" and one you believe is not.

Due date:  August 19

Wednesday, August 12, 2015

How many ways can you change Color to Black and White in Photoshop?


I know, I know...simply click the button on your camera to "discard" the color...but wait!  What if you could have a number of ways to change your images to black and white with complete control over the value and end result you really want  - just like the professionals?  Try the 6 ways here and know that much more!
Desaturate
1)    Image – Desaturate
2)    Image – Mode – Grayscale
a.    Click “Discard”
Hue/Saturation Tool
1)    Layer – New Adjustment Layer – Hue Saturation
a.    Move Saturation slider all the way to the left
Lab Color
1)    Image – Mode – Lab Color
a.    Go to Channels (this is in your layer bar)
b.    Select “Lightness” Channel
c.     Image – Mode – Grayscale
d.    Click “OK”
Gradient Map
1)    Make sure your Foreground/Background are Black and White
a.    Layer – New Adjustment Layer – Gradient Map
b.    Click “OK”
Channel Mixer
1)    Image – Adjustment – Channel Mixer
a.    Check “Monochrome”
b.    Manipulate Red, Green and Blue (but numbers must add to 100%)
                                              i.     If under 100%, image will go dark, if over 100%, image will lighten
•Red – 100% Red
•Yellow – 50% Red, 50% Green
•Orange – 75% Red, 25% Green
•Cyan – 50% Blue, 50% Green
Dual Hue/Saturation
1)    Layer – New Adjustment Layer – Hue/Saturation
a.    Move the Saturation all the way left, click “OK”
b.    Click on the Background
c.     Layer – New Adjustment Layer – Hue/Saturation
d.    Click “OK”
e.    Change Layer Blending Mode to Color
f.      Double-Click on Hue/Saturation, manipulate Hue.

How does adding lens color filters change your black and white image?
Filter – Noise – Despeckle
Image – Adjustments - Curves


Tuesday, May 12, 2015

…and the last one…promise...


What does "kinoptic" mean?  What does "kinoptic art" look like?

Your final CLASS assignment is to research this term and create a kinoptic, photographic piece of art.  You will need to think about two images that are opposites of one another (sun/moon, flower blooming/flower bud) and, using Photoshop, piece them together (this is where you'll have to do the visual research to see how to create the final piece...no examples posted here!).

Due May 18th, end of class.

Friday, March 6, 2015

Color me ________!

Color says a lot about who you are to those who see you.  Much like what you choose to wear, the colors you surround yourself with express everything from your personality to your unique sense of style.  In this assignment I want you to show just that – your personality and sense of style.

Using ALL of the 7 – 10 images, created a final piece based around a poem you feel strongly attached to.  Using Photoshop, you will be creating an art board approximately 12 x 12”.  You may crop and edit any way you like but please make the final image more than just a collage of square/rectangular images stacked together with the poem in the middle.  Think about the font you select and make sure it MATCHES and REFLECTS the feel of the final piece and poem.  You may use your own poetry or that of someone else but give the appropriate credit.

Oh, one final instruction.  Create your name as part of the visual piece and fill with either the color you have chosen or a photograph of the color you have chosen.  You learned how to do this earlier this year…


Due date:  March 16

Thursday, January 29, 2015

Teresa's ISO Project

To be done 1/2 hour before dusk or dawn:

1.  Select one location, object, scene in a shaded area - no full sun even at this late/early hour...
2.  Set your camera to the A Mode (Aperture Priority)
3.  Set the Aperture to f/4
4.  Starting with an ISO of 100, shoot your image/scene at every ISO your camera allows:
     100, 200, 400, 800 etc. - from the lowest setting to the highest.
5.  Use a tripod and shoot the same image every time.
6.  Keep your images in order and open in PhotoShop.
7.  Crop the images EXACTLY THE SAME - approximately 1/32 of the image
Full image with red area to be cropped...
8.  Once you have all images cropped IDENTICALLY, create a document in Photoshop and place them side by side, labeled with ISO first, then Aperture, then Shutter Speed.
9.  If you have no camera to use, either pair up with someone (both shoot separately, different subjects or each other) or borrow one of the school cameras.
10.  Due Tuesday, February 3rd.

Thursday, January 22, 2015

Quick Capture Challenge!

LETTERS, LETTERS, LETTERS!

Your next challenge:

We are alone but...
Sm...
She will...
1.  Choose a partner.
2.  See me for your "letters".
3.  Go out on campus and find (NOT CREATE!) objects that look like/read as the letters I have given you.
4.  IN PHOTOSHOP, download your images to spell the word you think I have given your team.
5.  Crop, alter the contrast, whatever you think will make your images interesting and readable, then save as JPEGS at 180 resolution and roughly 5 x 7".
6.  Create a NEW file in Photoshop to place your letters side by side.  the new document must be 180 resolution and should not be taller than 7".  The length will be determined by the number of letters your team has.
7.  Upload the final piece to the server AS A JPEG, labeled with your names and the title "Letters Capture".
8.  Due at the end of class today.

Monday, January 19, 2015

I used a Nikon D7100 with an 85mm Prime lens.
Shot outside, overcast, ISO 100

Thursday, January 15, 2015

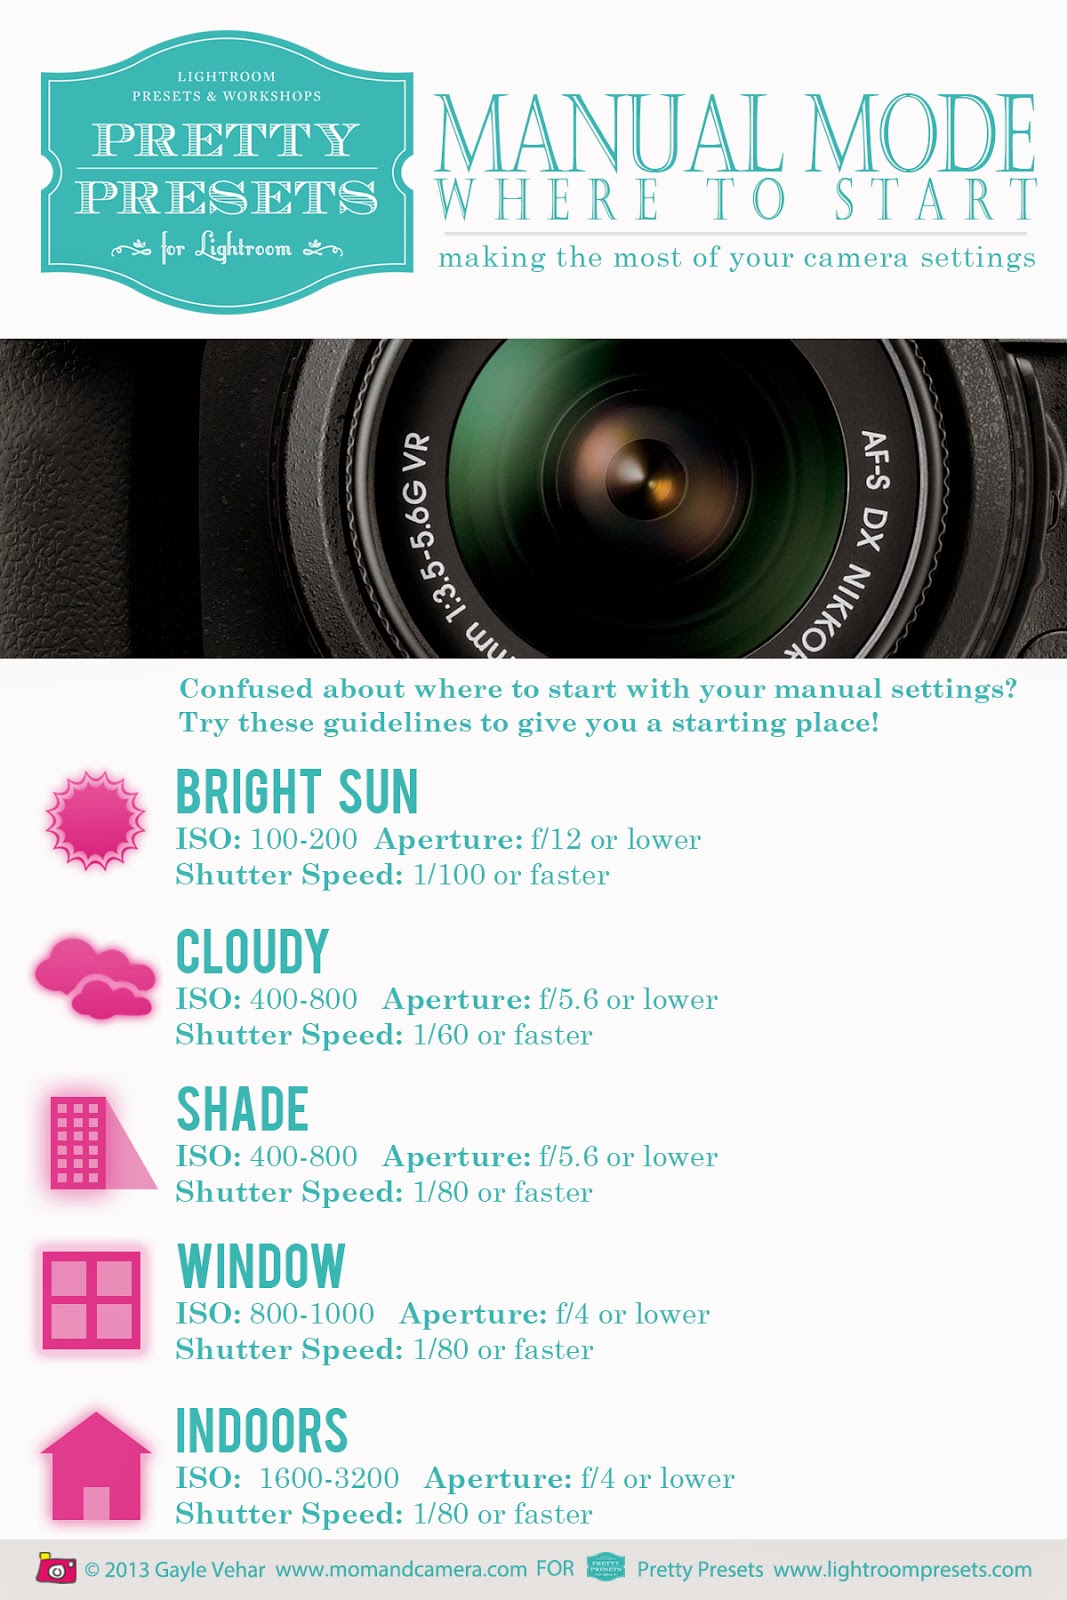
Understanding Aperture and Shutter Speed

Where to start...
by  

1. Aperture

Aperture is the amount of light that is allowed into the camera through an opening in the lens, and is measured in f-stops. The smaller the f-stop number, the more light that will be let into your camera. For example, at f/1.4, the opening in the lens will be wider than at f/22, therefore, the exposure will be brighter.
As you can see in this diagram of common f-stops, f/1.4 has a very wide opening, whereas f/11 is much smaller. Always remember: the smaller the numerical value, the larger the opening in the lens, and the brighter your photo will be.
You’re probably thinking, “Why would I want less light to enter my lens, why not just shoot at the widest aperture possible, at all times?” Well, when you have your lens wide open, less will be in focus in your photo. A photo shot at f/1.4 will have a shallow depth of field, with a lot of background blur. This can be great for portraits, but if you are shooting a landscape, for example, you will want to have more in focus in your photo, so you will want to avoid a shallow depth of field by having a smaller aperture of somewhere around f/16.
In the example above, look at the progression between f/1.8 and f/3.5. As you can see in the first photo, the building behind the camera prop, as well as the table in front, are not in focus. As you progress to f/3.5, more of the building and table come into focus, but the image gets darker, since less light is entering the lens.
The shutter speed also affects how much light is let into the camera, so let’s now look at shutter speed. Then, we will look at how shutter speed and aperture work together.

2. Shutter Speed

Shutter speed is exactly what it sounds like – how quickly the shutter moves, and it is measured in fractions of a second. The slower the shutter speed, the more light that will enter your lens, while a fast shutter will let in less light. In most cases, especially if you are shooting a moving subject, or you do not have a tripod, you will want to keep your shutter above 1/60, which is 1/60th of a second.
In this example, I set my aperture as small as I could, at f/22. As you can see, more of the buildings in the background are in focus than they were in the previous example, seeing as how more of the background will be in focus at f/22 than it will at an aperture like f/2.8.
Now, look at the exposure time for each of the images. At 1/20, the photo is extremely overexposed, because the shutter was very slow, and a lot of light entered the camera. As I progressed all the way to 1/200, the exposure got darker. For this scenario, somewhere around f/22 and 1/80 is close to the correct exposure.
If you have a slow shutter speed, be sure to watch out for motion blur. If you want to create sharp focus on something that is moving, you will need a fast shutter of, at the very least, somewhere in the neighborhood of 1/200. If motion is not an issue, then you will be able to use a slower shutter, below 1/60.

3. Your Assignment:

Choose an object, person, or point of focus that allows for distance.  Make the composition important.  Shoot, first, at the lowest aperture (f-stop) your camera is capable of, then at the highest f-stop.  My camera goes from f/2 up to f/22.  Bracket 5 images without moving the camera, just changing the aperture.  Now select ONE aperture you like in the first set of images and change only the shutter speed. Bracket 5 images, again, without altering the location or subject.  

In Photoshop, create a final piece sized to fit all 10 of your images.  Please leave at least 1/4 inch of white space between each image.  Label every image with the correct f/stop and shutter speed.

Due date:  January 20th at the end of class.