I'm sure you've all played around with text - written many papers for school, made posters for that English class you love, text constantly on your phone...but what do you REALLY know about type and design in Photoshop? Here's the assignment:
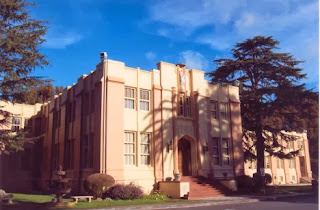
- Take a photograph of Notre Dame that is interesting and shows the school in its best light. Compose the image in your viewfinder so you will have space for placing text. NO FLASH.
- Think about why Notre Dame is such a great place to go to school and write down at least two reasons. You will be using those as your headline.
- Look at the examples below and think about advertising you've seen - billboards, magazines...what made you LOOK at something...then create your own headline on the image you've taken.
- The only rule is to be creative. You can use Photoshop for anything you shoot.
- Now go ahead - sell me on Notre Dame!
 |
| Wow! What a fabulous school! |
Want more options for being text-creative? Go to the book and look at Chapter 8.
Type tool options
In the options bar, set the following Type tool options:
Font Family Applies a font family to new or
existing text.
Font Style Applies font styles, such as bold,
to new or existing text.
Font Size Applies a font size to new or
existing text.
Color menu Applies a color to new text or
selected text.
Leading menu Sets the space between lines
of new or selected text.
Faux Bold Applies a bold style to new or
existing text. Use this option if your font doesn’t have a true bold style that
you can select from the Font Style menu.
Faux Italic Applies an italic style to new or
existing text. Use this option if your font doesn’t have a true italic or
oblique style that you can select from the Font Style menu.
Underline Applies an underline to new text or
selected existing text.
Strikethrough Applies a line through new text
or selected existing text.
Align Text Specifies text alignment. If text
orientation is horizontal, lets you align text: left, center, or right. For
vertical orientation text: top, center, or bottom.
Toggle Text Orientation Changes
vertical text to horizontal and horizontal text to vertical.
Warp text Warps text on the selected layer.
Anti-aliased Applies anti-aliasing to make
text appear smoother.
 |
|
Applying anti-aliasing
A. Anti-aliasing off
B. Anti-aliasing on
|
Text on Shape
You can add text to the shapes available in the Text on Shape
tool.
1. Select the
Text on Shape Tool  . To quickly change the current
text tool, press Alt/Option and click on the current tool.
 |
| Text on Shape |
2.
From the available shapes, select the shape on which you
want to add text. Drag the cursor on the image to create the shape.
3.
To add text to the image, hover the mouse over the path
until the cursor icon changes to depict text mode. Click the point to add text.
 |
| Click and enter text |
Modify text in the same way that you modify normal text.
4.
After adding text,
click Commit. For some of the shapes the text
has to be written inside. You can move the text around the path or by
inside/outside by holding Cmd/Ctrl while clicking and dragging the mouse (The
text appears in a small arrow). You can drag that cursor into a selected area,
the text path is allowed inside/outside an area.
Text on Selection
Add text on the outline of a path created from a selection. When
you commit a selection, the selection is converted to a path on which you can
type text.
1.
Select the Text on
Shape Tool . To quickly change the current
text tool, press Alt/Option and click on the current tool.
 |
| Text On Selection
|
2. Place the cursor on the object in the image
and drag the cursor till you get your desired selection. You can adjust the
size of your selection using the Offset slider.
 |
| Make Selection
|
When you confirm the selection, the
selection is converted to a path.
3. To add text to the image, hover the mouse over
the path when cursor icon changes to depict text mode. Click the point to add
text.
 |
| Add Text
|
After you add text, you can modify it like regular text.
4.
After you have
completed adding text, click the Commit . Cancel to start your work flow
again.
Text on Custom Path
You can draw and add text along the custom path.
1.
Select the Text on Custom Path Tool . To quickly change the current
text tool, press Alt/Option and click on the current tool.
 |
| Text On Custom Path
|
2.
Draw a custom path over the image. You can commit/cancel
the drawn path to redraw from the tool options bar.
3.
To refine or redraw the path, click Modify in the tool
options bar. Use the nodes that appear on the path to modify it.
4. After you
have completed creating a path, click the mouse at any point along the path to
add text. Modify text in the same way that you modify normal text.
 |
| Add Text
|
5.
After adding text, click the Commit .
Create and use masked type
The Horizontal Type Mask tool and Vertical Type Mask tool create
a selection in the shape of text. You can have fun with text selection borders
by cutting text out of an image to show the background, or pasting the selected
text into a new image. Experiment with different options to personalize your
images and compositions.
 |
| Horizontal type mask used to create a filled selection. |
1.
Using the Expert mode, select the layer on which you want
the selection to appear. For best results, don’t create the type selection
border on a text layer.
2.
Select the Horizontal Type Mask tool or the Vertical Type Mask
tool .
The type selection border appears in the image on the active
layer.


